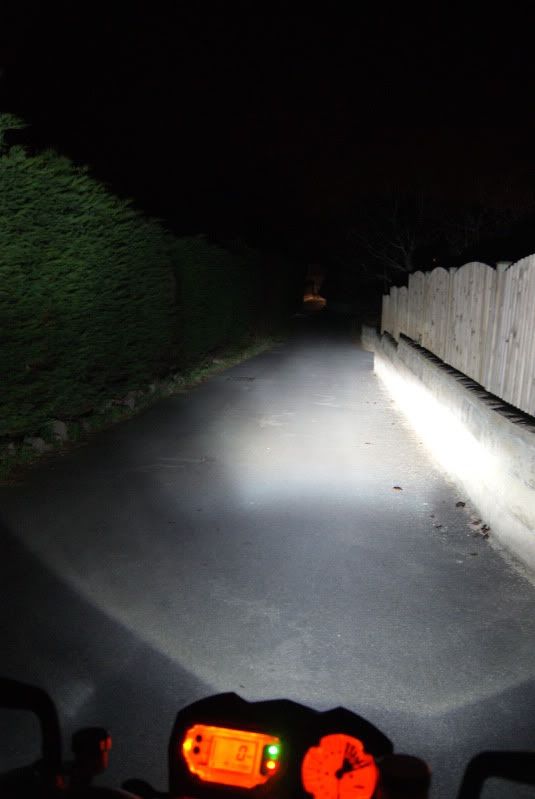
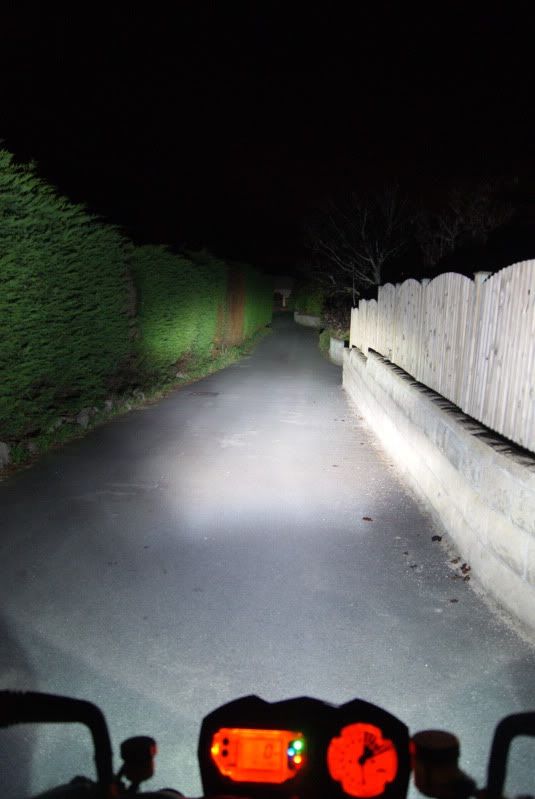
This post could not be recovered from the original forum.
H.I.D conversion
67 posts · Started by Razy · 26 Aug 2009
Post 2 by Twisted Jester,
#2This post could not be recovered from the original forum.
Post 3 by Colonel_Klinck,
#3Only hard thing is changing the standard sidelight for a LED one as its a bitch to get to. You have to do because the standard sidelight looks all yellow and shite against the lovely white light of the HID. LED light cures that and finished the look off nicely.
Post 4 by Razy,
#4This post could not be recovered from the original forum.
Post 5 by Colonel_Klinck,
#5This post could not be recovered from the original forum.
Post 6 by Razy,
#6This post could not be recovered from the original forum.
Post 7 by ktmsuperdukeeddie,
#7This post could not be recovered from the original forum.
Post 8 by kenscottphoto,
#8This post could not be recovered from the original forum.
Post 9 by CEREC1,
#9Post 10 by zoddas,
#10This post could not be recovered from the original forum.
Post 11 by CEREC1,
#11This post could not be recovered from the original forum.
Post 12 by DeLuce,
#12This post could not be recovered from the original forum.
Post 13 by Anata,
#13I work nights so I ride in the dark atleast 5 days a week, and it was a great purchase since the stock one sucks.
Post 14 by zoddas,
#14I managed to fit one of the ballasts from my 05 into the 08 headlight but I'm going to have to get slim ballasts if I want both again.
Post 15 by Bert,
#15This post could not be recovered from the original forum.
Post 16 by Anata,
#16This post could not be recovered from the original forum.
Post 17 by joey120373,
#17This post could not be recovered from the original forum.
Post 18 by Bert,
#18This post could not be recovered from the original forum.
Post 19 by joey120373,
#19A few years back I was on a BMW board with an ongoing discussion of hi power H-4 bulbs, but it was amazing that no one wanted to accept that half the battle was aiming the light correctly. This is just as true with HIDs, but in a housing not designed for the capsule it's sometimes not possible.
Post 20 by Bert,
#20Post 21 by Bert,
#21Post 22 by zoddas,
#22How much do you need to cut from the reflector?
Post 23 by cdlabate,
#23This post could not be recovered from the original forum.
Post 24 by cdlabate,
#24This post could not be recovered from the original forum.
Post 25 by zoddas,
#25This post could not be recovered from the original forum.
Post 26 by Anata,
#26This post could not be recovered from the original forum.
Post 27 by joey120373,
#27Post 28 by rob1botes,
#28This post could not be recovered from the original forum.
Post 29 by rob1botes,
#29Here's my old bike for comparison


Post 30 by rob1botes,
#30This post could not be recovered from the original forum.
Post 31 by rob1botes,
#31A properly designed reflector will work just fine, but they are optimized for a single type of source. The arc chamber does not have hot spots as does a filament, and a reflector designed to utilize those hotspots will be incorrect for a HID, so no, you don't get a better beam, you just have more light out there. You will always have stray light with this setup. If you look at Hidrios pics you see a big hot spot on the ground in front of the bike. A well designed light will give a much more even spread, and makes it easier for your eyes to see.
The new freeform reflector/clear lens (like the SD's) are much better than older style reflector/fluted lens combos, which give horrible results with HID conversions.
Post 32 by Mr_Trecolareco,
#32This post could not be recovered from the original forum.
Post 33 by MrZ32,
#33This post could not be recovered from the original forum.
Post 34 by rob1botes,
#34This post could not be recovered from the original forum.
Post 35 by GetSpiffed,
#35I am hoping that I can just disassemble my headlight & remove the plastic lens from the back reflective panel.
thanks Rob
Post 36 by rob1botes,
#36This post could not be recovered from the original forum.
Post 37 by websch,
#37I hardly ride at night but when I do the mediums light more then the high beam...
Post 38 by rob1botes,
#38Post 39 by rob1botes,
#39This post could not be recovered from the original forum.
Post 40 by rob1botes,
#40This post could not be recovered from the original forum.
Post 41 by omky756,
#41I'm waiting to see your conversion bro...How much time and temp in the oven releases the glue to the unit..????
Cheers
Mike
Post 42 by omky756,
#42Not done yet but perhaps this snow storm will be the impetuous to get this done. I did bake the headlight at about 190'F for about 10 minutes. A little longer would not have hurt
EDIT Sorry just noticed that his pictures are no longer coming up.
Post 43 by rob1botes,
#43Mike
Post 44 by rob1botes,
#44You guys are going to make me finish this project. Cool.
Post 45 by rob1botes,
#45Glad we're helping to spur you on with completing your project
cheers Rob
Post 46 by omky756,
#46This post could not be recovered from the original forum.
Post 47 by omky756,
#47Camera's battery is dead and a whole Sunday with snow.in October got wasted . Perhaps during the week.
Stephan
Post 48 by rob1botes,
#48This post could not be recovered from the original forum.
Post 49 by PBRnr,
#49Post 50 by PBRnr,
#50Hoping to see pics of your headlight setup..
One of my next projects...
AFTER..I finish the 6 I'm working on now...
Cheers
Mike
Post 51 by GetSpiffed,
#51This post could not be recovered from the original forum.
Post 52 by omky756,
#52Rob, I always likened the SD to the angular styling of the Tumbler...thought a matte metallic tone would look pretty badazz, like the calipers/spoiler hydraulics
good luck!
Post 53 by rob1botes,
#53Post 54 by cdlabate,
#54thank
Post 55 by rob1botes,
#55This post could not be recovered from the original forum.
Post 56 by cdlabate,
#56This post could not be recovered from the original forum.
Post 57 by omky756,
#57Post 58 by rob1botes,
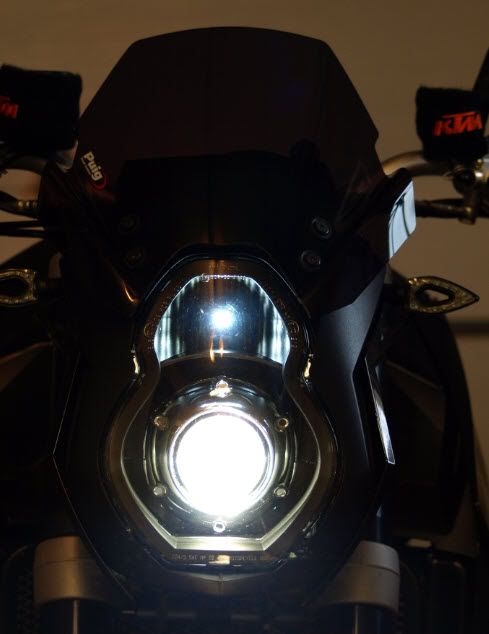
#582008 SuperDuke HID Bi-Xenon projector Retrofit project:
I purchased the following from
They are great guys to deal with & have really good customer support.
Sportbike Stage III Kit, which comes with:
- Ballast: Morimoto 3Five (35W)
- Bulb: Morimoto 3Five 4300K
- Projector: Morimoto Mini Bi-Xenon (D2S)
- Shroud: GTi-R
- Wire Harness: H4
Also purchased a roll of butyl glue strip separately.
1. Start by taking off the complete headlight assembly. Before I unplugged all the connectors, I took lots of photos, just incase I had problems re-
connecting them. Taking the assembly off only requires removal of the two allen cap screws at the top & two pins (held on with clips) at the bottom.
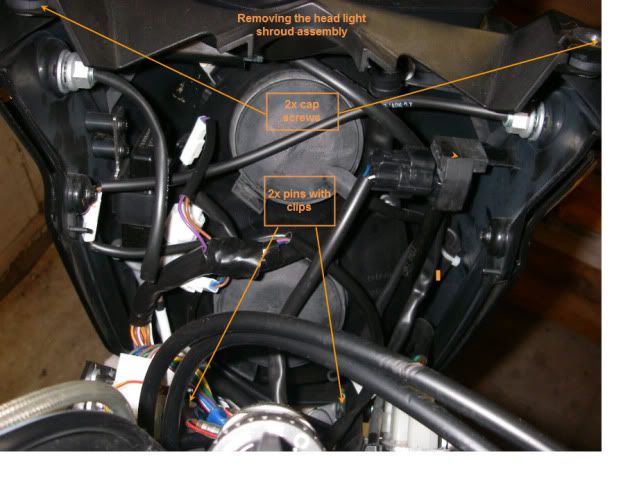
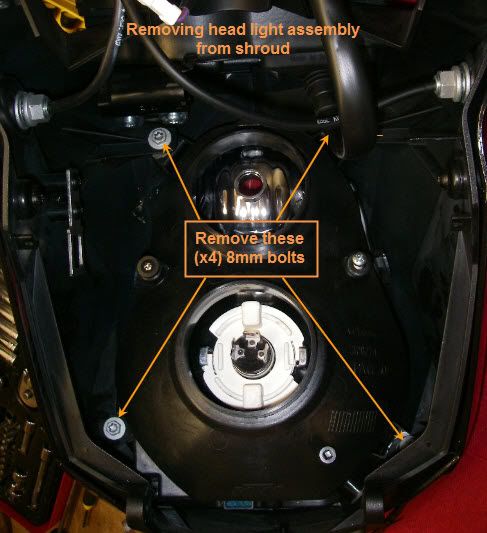
2. Once the headlight assembly is off the bike, then dismantle the actual headlight from the assembly. Remove the little smoke flip screen (4x allen cap
screws). In front, just below the instrument panel, is a self taping philips screw, take it out (this allows for the mask housing to split in two). Then
take out the four 8mm bolts holding the headlight to the housing. Once these are removed, you can separate the headlight from the housing. I put
some bubble wrap over my instrument clocks just to protect them from being scratched while being stored.
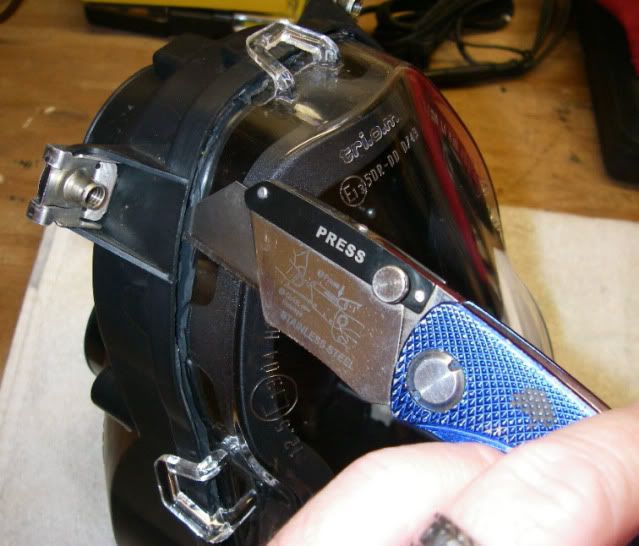
3. Now you’re ready to separate the headlight. I first, very carefully ran an X-Acto knife along the edge of the shield to slit the glue line. Our European bikes have the perma-seal glue holding the front lens to the rear housing (it sticks like crazy & is very hard) Most Japanese bikes have the softer butyl rubber glue, which comes apart real easy.
Turn on your oven & pre-heat it to 265 degrees F. Place the headlight in the centre of the oven for 7 minutes. Put on some mechanic/work gloves. After 7 minutes, take it out & very carefully start to pry the lens away from the housing. I had to put it back into the oven for another 7 minutes to further soften up the glue. You can use a flat blade screwdriver to help pry the lens away, but be Very Careful, it wont take much to damage the housing, scratch the lens or snap one of the locking tabs. Just be patient, take your time & it will come apart. You may even need another 7 minutes in the oven. Once you have it all separated, use some rubbing/isopropyl alcohol & a scalpel/X-Acto knife to clean off as much of the perma-seal glue as possible.
4. Now you can separate the reflector bucket from the rear housing. Back out the adjuster screws on the rear of the housing & the reflector bucket will pop off. NOTE: before backing the screws out, make a note of how far they are screwed in. A digital camera makes life a lot easier to snap pics as you’re going along.
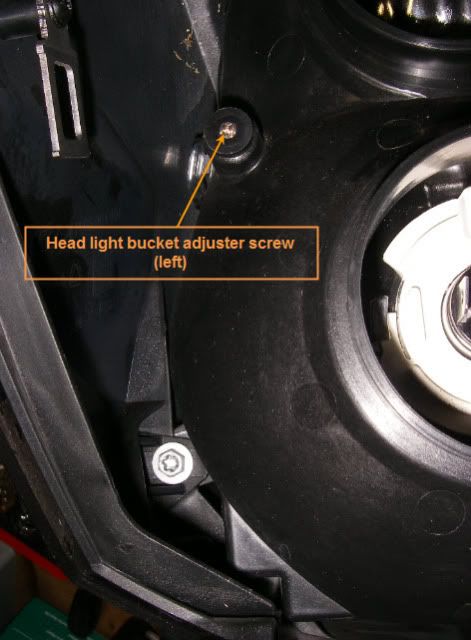
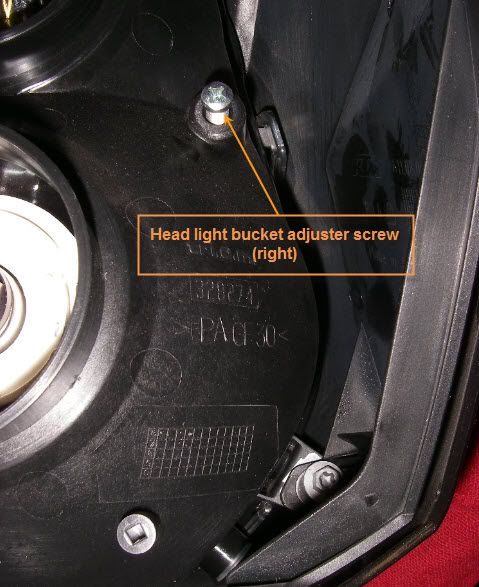
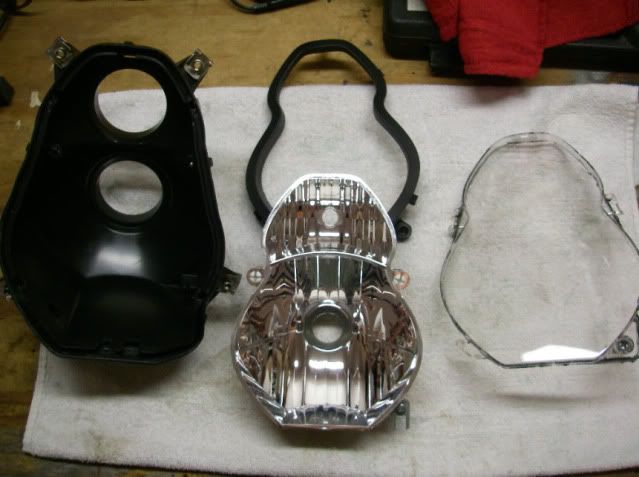
5. Next I had to Dremel out the existing light bulb hole in the reflector bucket. I had to increase it to 34mm to accommodate the new projector.
I cut out a piece of steel keystock & JB welded it to the H4 adapter. This will provide a way to hold the H4 adapter in place when cinching down the lock nut and keep the projector on the correct horizontal plane (parallel) to the horizon.
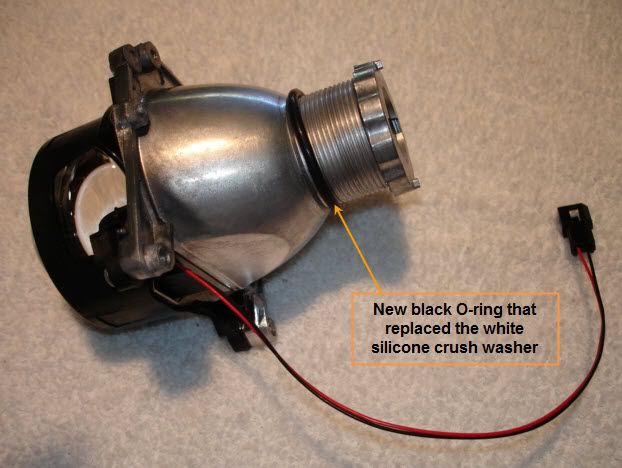
I also replaced the stock white silicone crush washer with a black O-ring (1/8" diameter ring, 1 1/8" I.D., 1 3/8" O.D.) I did this to allow more gap between the projector lens & the headlight lens. You’ll need it for when you adjust the headlight range up or down.
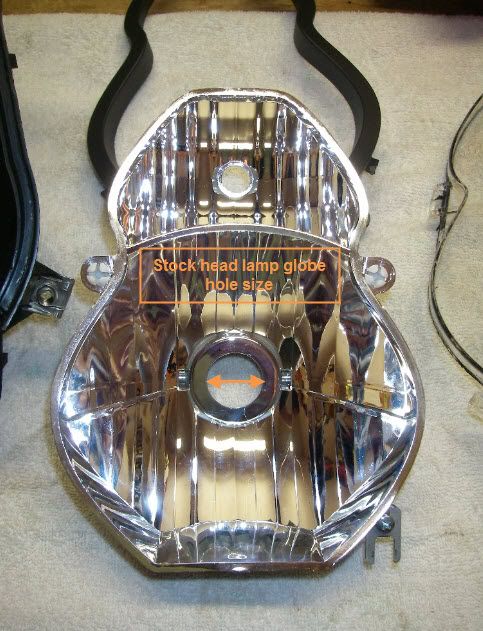
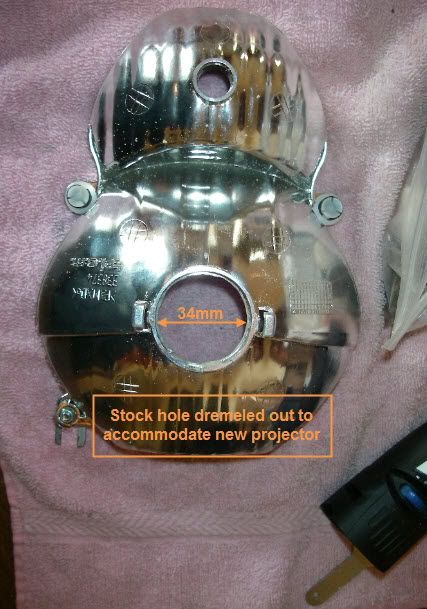
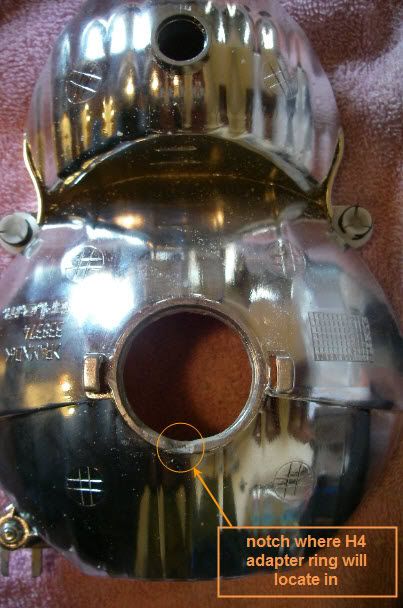
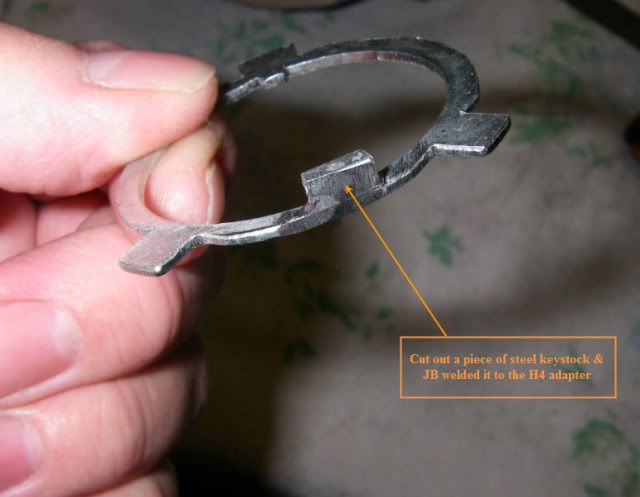
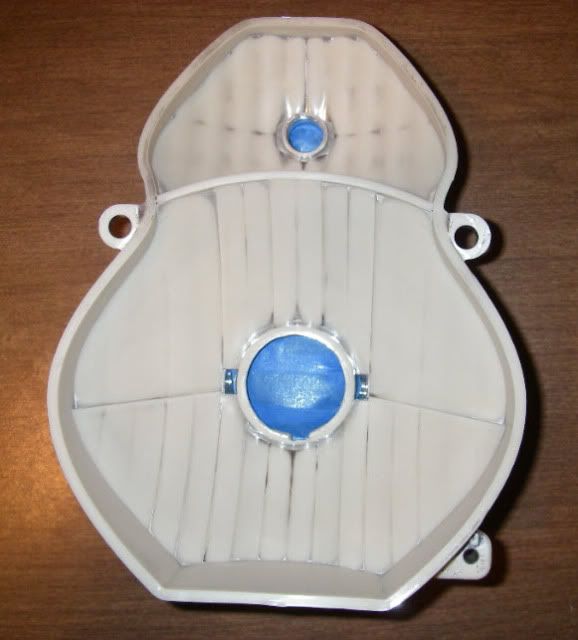
6. I then sanded down the reflector bucket using 280 grit water sand paper. Sprayed it satin black using Krylon Fusion plastic spray paint. Seeing as the reflector is no longer going to be used for light production, & it just plain looks better black IMO.
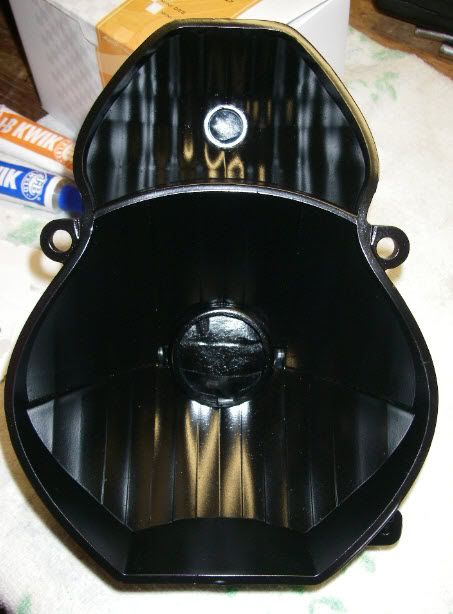
7. I opted for the GTi-R shroud for the projector. This was the one, which gave the most coverage around the projector housing & was low profile enough not to come in contact with the headlight lens.
Assembled the projector into the reflector bucket. Re-attached the reflector bucket to the headlight housing. I opted to use some butyl glue strip for re-assembly…just a lot neater, easier & cleaner than using silicone or perma-seal.
Then, back into the pre-heated oven at 265 degrees F for 7 minutes. (Remember your gloves again) As soon I removed it from the oven, I made sure all clips etc… lined up & then clamped (using 12” ratchet bar clamps) the lens in place for 30 minutes until everything had cooled down.
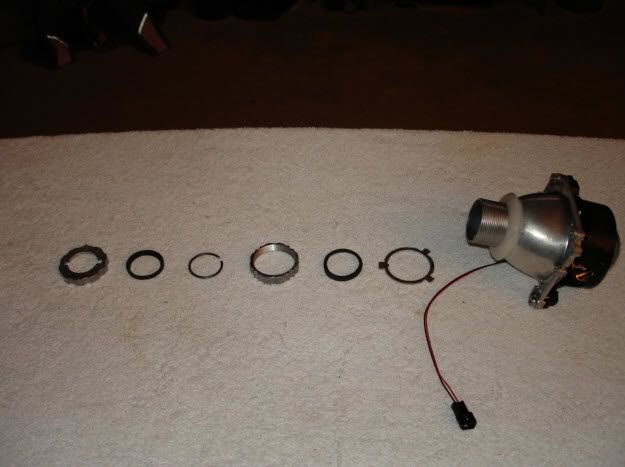
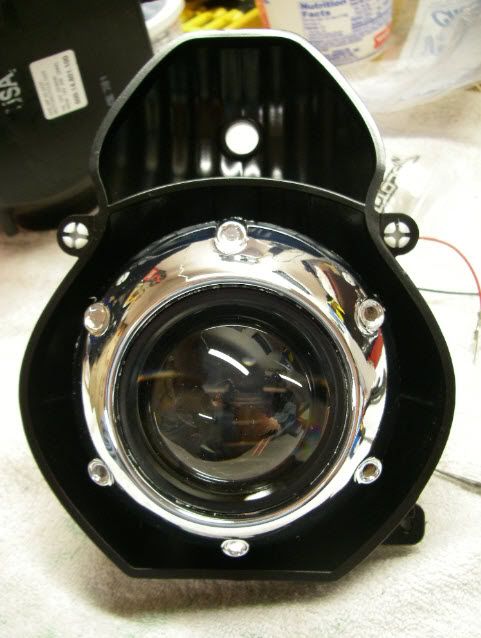
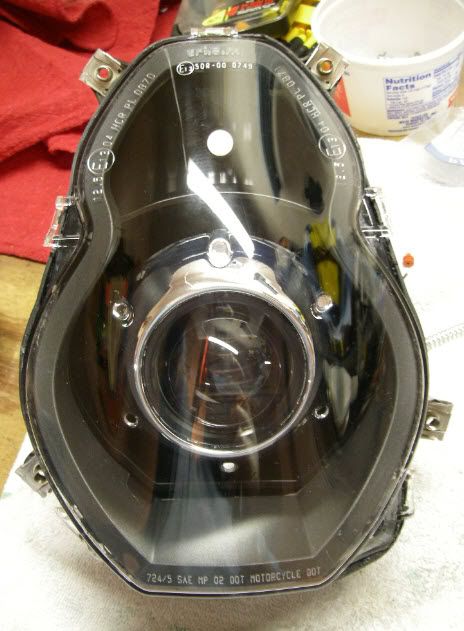
8. In between waiting for the paint to dry, I ran the wiring up from the battery & located the ballast behind the headlight (on the left hand side).
The Retrofit Source website has good explanations of how to wire it all up.
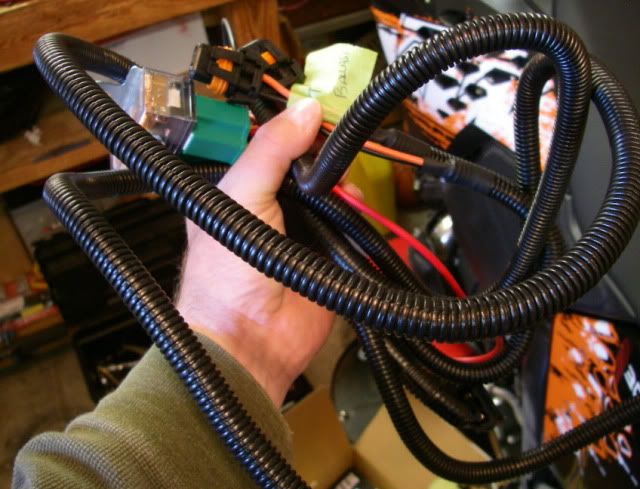
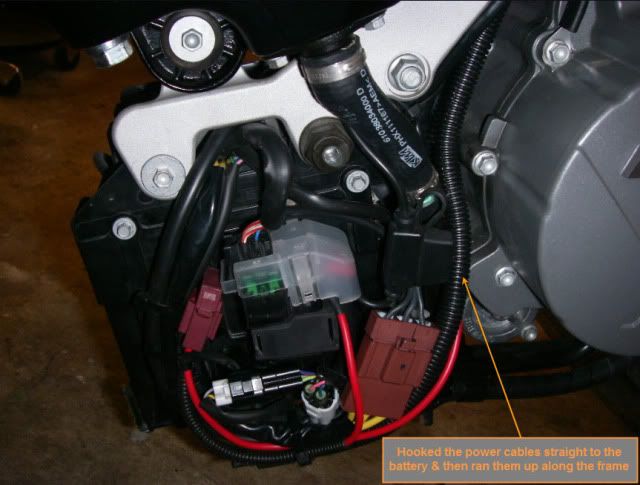
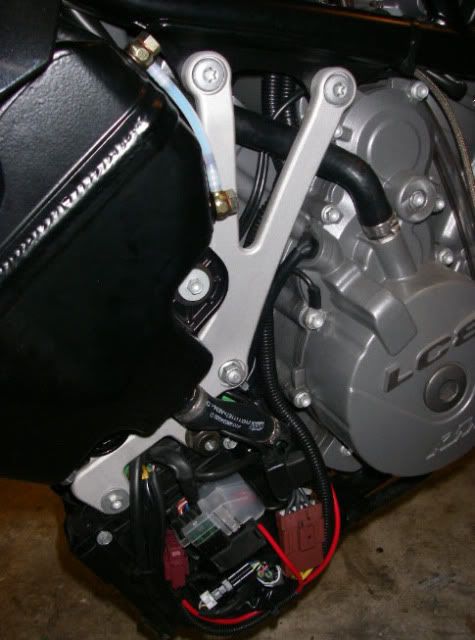
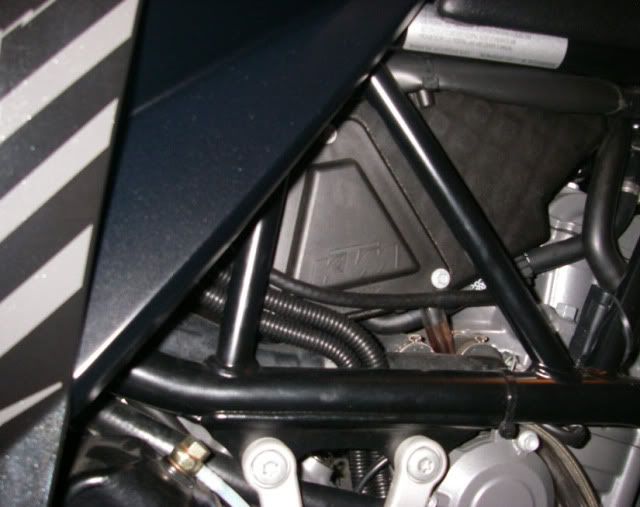
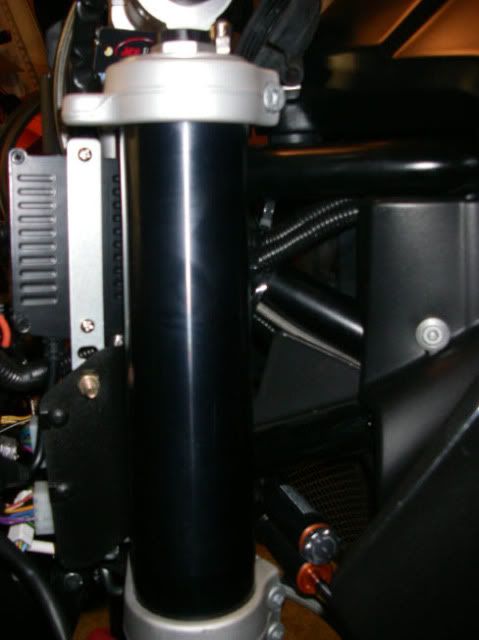
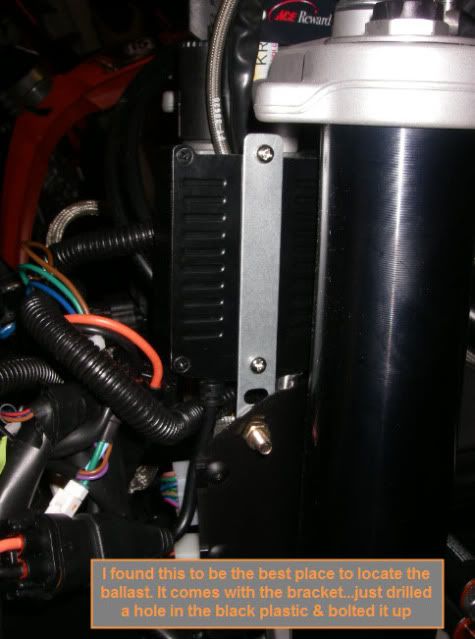
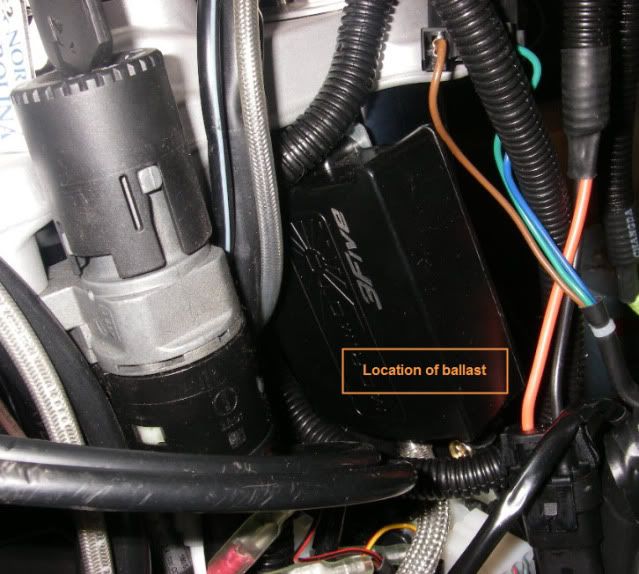
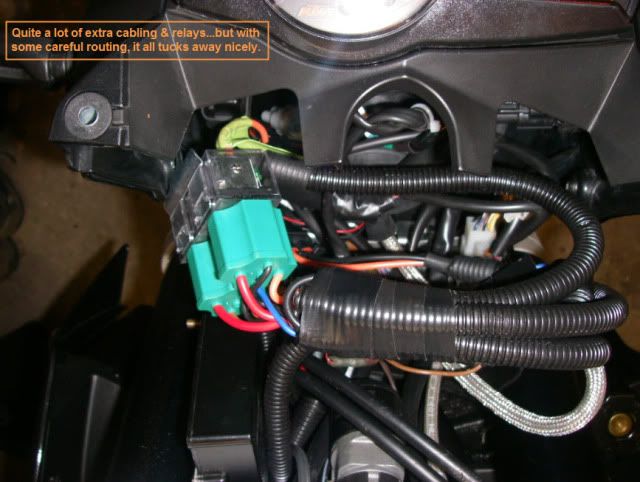
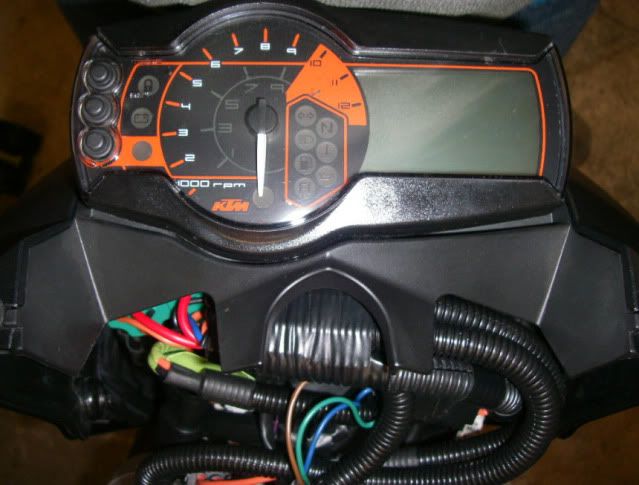
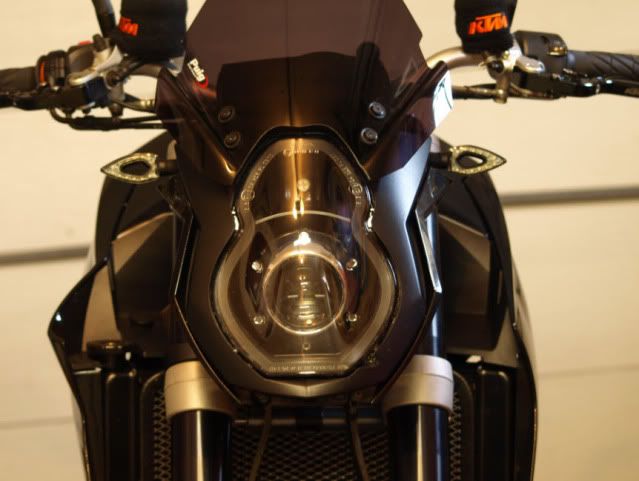
9. Re-installed the head light assembly into the shroud. Re-mounted it to the bike, re-connected all the wires & tucked the new wiring away behind the headlight. Buttoned everything up & set the headlight range. All done……well almost….lol…while I had the head light shroud off I decided to wire in some new smaller LED turn signals…they sure do look better than the big stock ones.
Post 59 by kowekiller,
#59Post 60 by kowekiller,
#60Great write up and tidy job....
Night pics bro..
Cheers
Mike
Post 61 by Anata,
#61cheers Rob
Post 62 by Bert,
#62Post 63 by GetSpiffed,
#63Dit you make the notch in te reflector, where th H4 adapter ring wil locate in, yourself, or was it allready there?
Thanks, Pepijn
Post 64 by rob1botes,
#64This post could not be recovered from the original forum.
Post 65 by GetSpiffed,
#65And how did you allign the notch on the ring to make sure the projector is leveld horizonlally?
I'm gonna do the mod myself next month when my bike is returning from hibernation.
Grtz, Pepijn
Post 66 by NME,
#66This is a great write up, and I am keen to get started on this for my bike.
Just wanted to ask a question about the process though:
When using the butyl tape to seal the housing again, where did you apply it? I can't see it in the picture and I am confused about how it seals the housing. It just looks so neat and tidy, I'm having trouble seeing how you re-sealed it!
Is it applied to between the new sprayed black housing and the clear light cover?
Also, is the butyl tape affected at all by the oven process?
just want to make sure I have all the facts before I attempt this.
Cheers,
Post 67 by BassAgent,
#67My change was to paint the area around the projector orange to be a true KTM. And I put an LED bulb in the upper position so that the light color matches.
To do the painting I did the sanding of the bottom portion only and then masked off the entire upper portion. A few coats of engine paint (I had to pick between Chrysler Hemi orange and Chevy orange - I picked Hemi I think - and it is a little off - Chevy would probably have been closer) and remove the tape and then let it cure and install the projector.